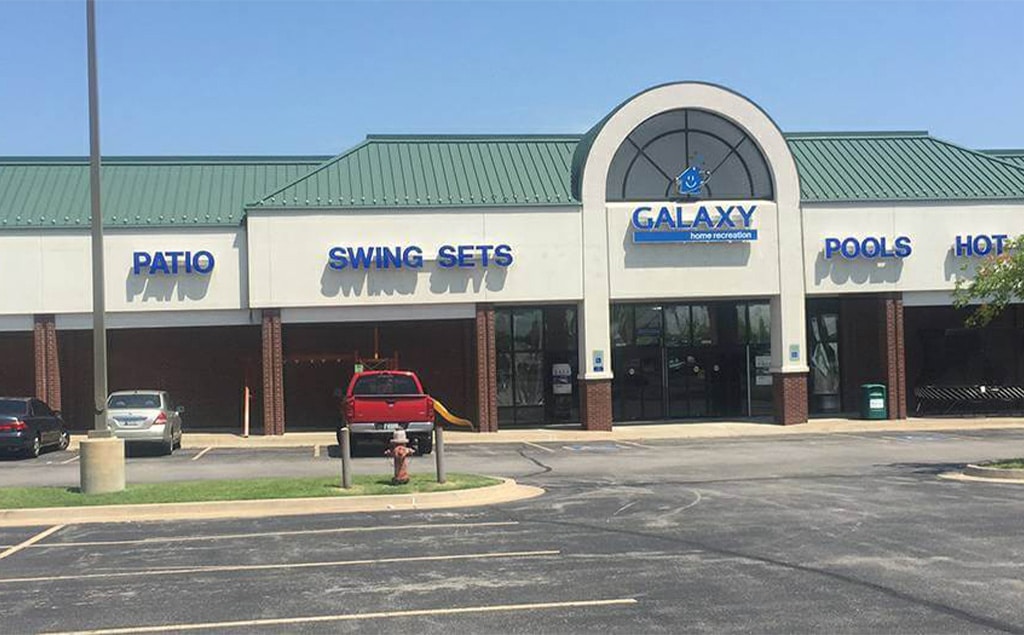
Welcome!
Welcome to the Galaxy Pool Spa Patio family! The following guide is to help you understand what is involved in building and maintaining your new pool.
Your pool installation will require many pre and post install steps. Please review your install agreement carefully. Also, remember your pool will be a “construction zone” even after installation.
At the end of every summer, You will need a pool cover to close your pool for the season. You can purchase a cover at any Galaxy Pool Spa Patio location. Keep in mind, pool covers arrive by Labor Day. At that time, we will also gladly instruct you on how to best close down your pool for the winter.
For videos and instructions on caring for your pool as well as opening and closing your pool, please check out our learning center.
Free Shipping on
Chemical Orders of $99+
Pool School
Join us for Pool School at 9am on the first Saturday of every month. This monthly school will give personal instructions on how to care for your pool, balance your water, maintain your water-care system and keep your pool up and running for many years to come! Pool school is FREE for all Galaxy customers.
Before Installation Checklist
- Underground Lines: Locate and clearly mark electric, phone, cable, or any other utility lines, septic tank, and field lines on or near pool site prior to excavation. Galaxy requires the customer call 811. Please note that 811 will not mark sewer, septic, sprinklers, french drains, or any private lines. Please see your install agreement for more details.
- Permits: Check with local, county, and state codes departments and provide any permits required to issue complete compliance with all code ordinances.
- Pool plus Pump & Filter Location: Locate and mark the pool site and filter location prior to excavation and in accordance with all state and local codes. (Mark “P” pool location, “F” for Filter and “B” for backfill dirt)
- Find our Access: Provide a minimum of 6’ access path for excavation equipment. Galaxy Pool Spa Patio will not be responsible for damage to the yard, sprinklers, driveway, or any obstacles in access path.
- Sand Material: Order and pay for fine mason sand, and arrange for delivery within 24 hours of installation of pool. Sand should be placed within 20’ of pool site, but not directly on the area to be excavated. Some customers choose to place sand on tarps for easy clean-up.
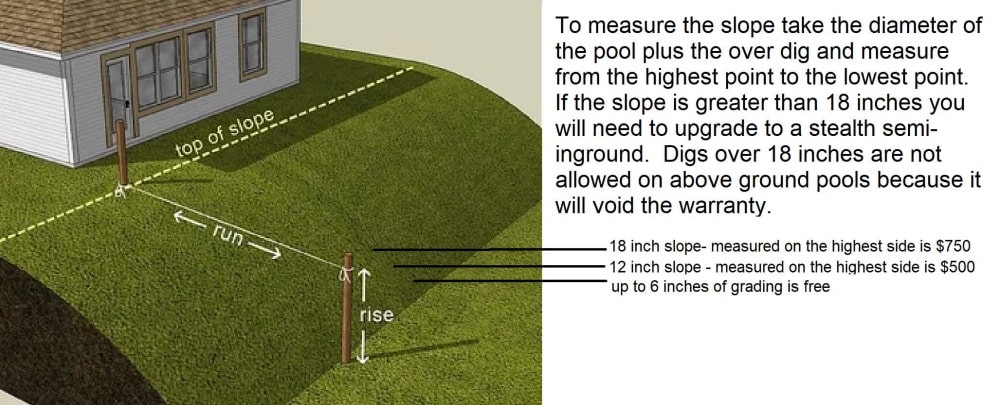
- Extra Services: Prior to install, customers may pay directly to Galaxy for slope/burial up to 18″. At time of install if an installer deems it necessary to dig due to slope the customer will contact galaxy for payment prior to work. Other instances when extra charges could be incurred are roots, rocks, stumps, etc.
Sand Requirement:

After Installation Checklist
- Fill Pool: Furnish water and fill the pool to the proper level (approximately 1/2 way up the skimmer opening) before starting filter system. See “Filling Instructions.”
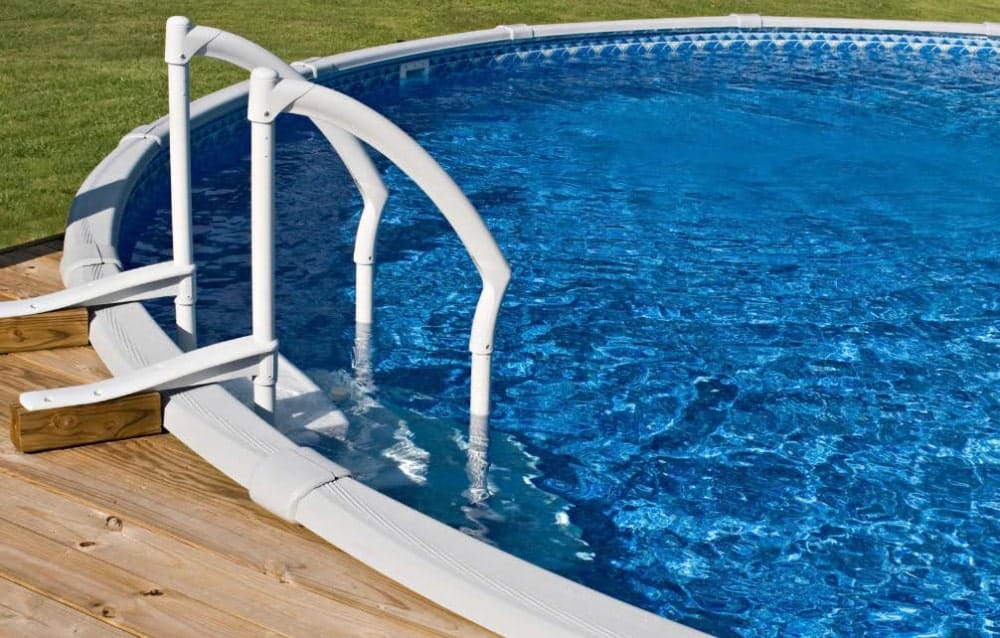
- Install Steps: Wait at least 48 hours after filling pool to install the steps and any other accessories. Galaxy does not install stairs or accessories.
- Grading Services: Grade, remove, spread, and/or backfill any excess dirt or sand left around the pool.
- Extra Services: Pay for any excavation beyond what is included. Requests for additional work must be made prior to installation. Payment is to be made to the excavator.
- Backfilling Your Pool: Installers do not backfill the dirt around your pool. Your pool will need to be completely filled with water prior to backfilling for stability. You must backfill at minimum 3” around your pool. This should be done as soon as possilbe to prevent sand washout. Liner wrinkles and imperfections will not be covered under our worry free guarantee.
- Pool Safety: Teach pool safety to family and guests, specifically NO DIVING, SHOVING, PUSHING, or HORSE PLAY. Install and use alarms and all other safety devices ensuring compliance with all safety regulations.
- Electrical: The customer must provide a 20 amp 110v power source for the filter that is protected by a Ground Fault Circuit Interrupter (G.F.C.I.). This service should be provided by a qualified electrician in accordance with state and local codes after the pool has been installed. Note: An extension cord does not meet electrical codes and will void the pump manufacturers warranty. You need to schedule your electrical the DAY OF or AFTER the pool is installed, not before.
*NOTE: If your pool is being installed on a concrete bottom, a foam cover must be used. We recommend the Happy Bottom Foam Cover which can be purchased from Galaxy.
Laying Out Your Pool
To begin, make sure that the pool site is not within 15’ of any overhead power lines, and 10’ from any trees. The pool can not be built over any part of a septic system, and you are responsible for making sure the pool is not infringing on any property lines, easements, or built over any utility lines.
Note: Required distances from property lines vary in every community. Most of this information can be obtained when you get your permit, if required.
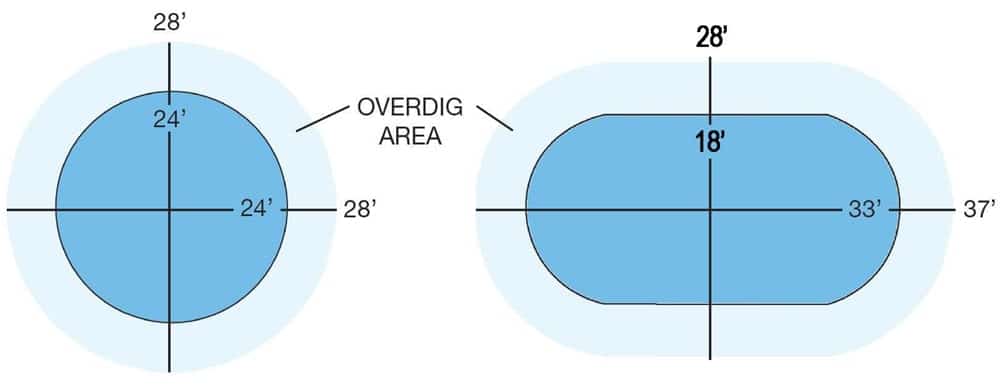
Round Pools: Once you have chosen your site, place a screwdriver into the ground at the center of the pool. Secondly, measure a section of string that is half of the diameter of your pool, plus an extra 2’. For example, a 24’ pool would require a 14’ string. The extra 2’ is for the over dig of the pool site. We will need to have a minimum of 2’ around the pool to have the room for proper installation. Next, tie one end of the string to the screwdriver, and while pulling the string tight, walk the circumference of the pool and mark it with several stakes or paint.
Oval Pools: Oval pools are done in about the same manner as round pools. Keep in mind that due to the side braces on an oval pool, the “over-dig” requires the dimensions of the pool, plus 2’ on the width and 5’ on the length. For example, an 18’ x 33’ oval would be staked out at 28’ x 37’. Stake out or paint the area as best you can, and the installer will verify the site for you.
When planning pool location remember these keys questions:
- Approximately how far out of level is the pool site (inches)?
- Are there overhead power lines near the pool site?
- Where are your easements?
- Are there underground utilities marked or unmarked?
- Are there any trees or tree stumps near the pool site?
- Do you have a septic system?
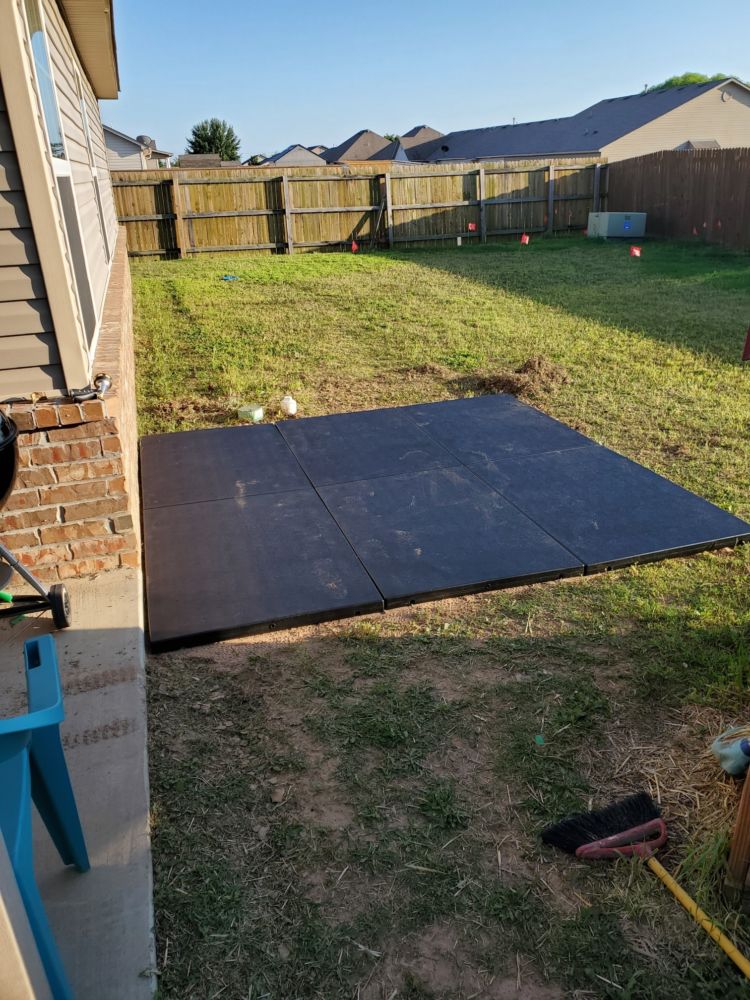
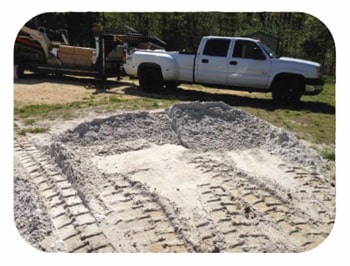
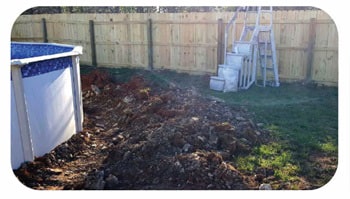
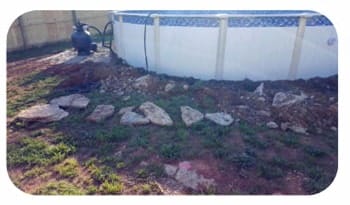
Installation Photos
Most homeowners would like to know what their project will look like after installation. Below are some great photos of our installation and what to expect after the project is completed.
delivery charge if you don’t have enough.
Existing Deck Installations
If your have an existing deck around your pool, we can still install a new pool. The illustration below shows what your new pool will look like if your pool size is different and also the up to 24” inch gap that may be left when installing the same size pool.
Even when replacing an identical size pool, difference in manufacturers and pool models often vary slightly in dimensions or number of uprights. This can result in the need for a carpenter to modify your deck before or after the installation.
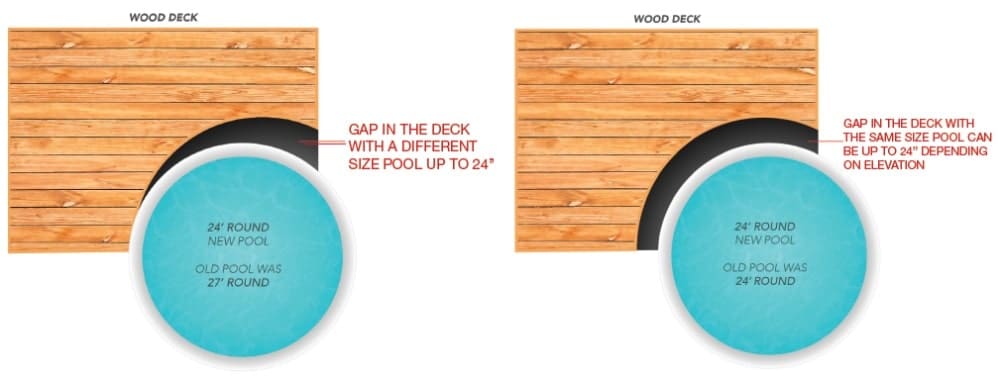
Note: Due to varying conditions pool installations beside pre-existing decks, Galaxy Pool Spa Patio and/or their installers will not be responsible for precise pool placement, elevation, or joining of pools beside pre-existing decks. Galaxy Pool Spa Patio and their installers are not responsible for any gap up to the 24-inch range.
Balancing Your Pool Water
Maintaining your pool water in the proper balance pays big rewards. As a result, it makes for more comfortable swimming and less maintenance.
If the pool water is not properly balanced, it could cause a number of costly problems:
- Damage to liner
- Damage to pump, filter, and equipment
- Burning of eyes and skin
- Cloudy water
- Algae growth
- Bacteria/unsafe swimming conditions
All of these factors affect proper water balance:
- How often you use the pool
- Weather (rain, sun, wind)
- Dust debris
- Circulation
- Number of swimmers
- Animals
- Water treatment products used
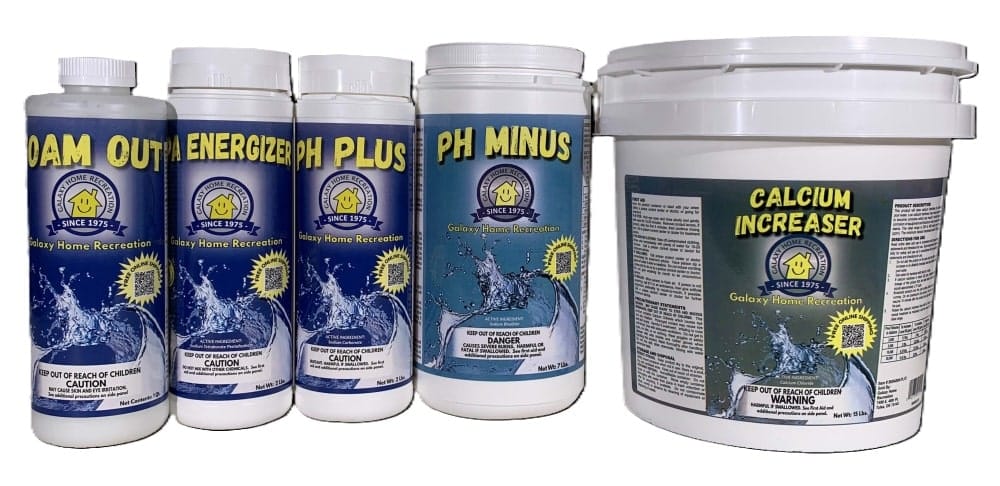
Galaxy offers free shipping for all chemical and/or filter purchases and offers free pickup at your local store. Shop Online or contact your nearest showroom to order.
The following shows the ranges for basic water chemistry balancing

Definitions
pH Balance Chart
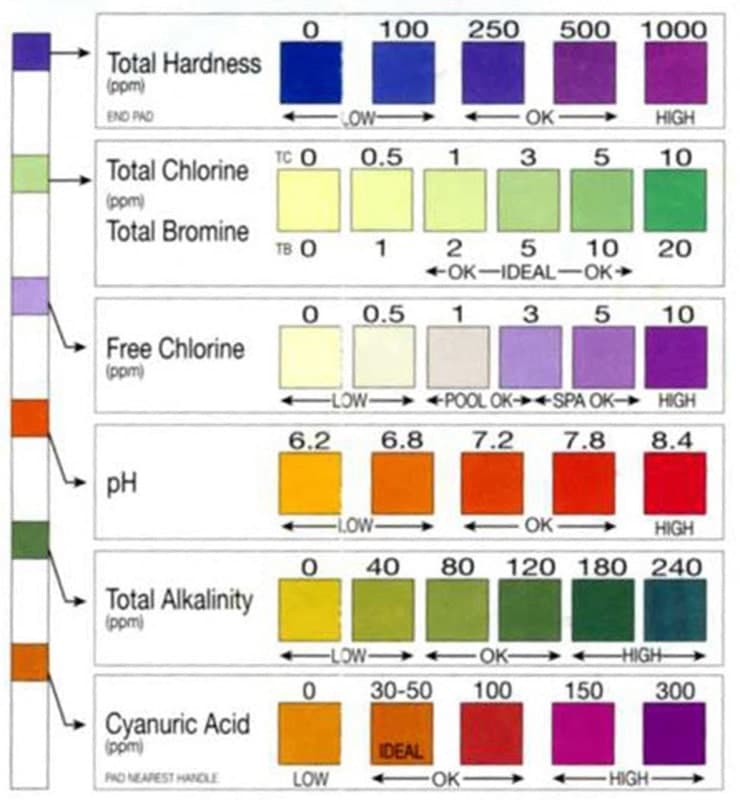
pH: Proper pH levels allow other chemicals to do their work. It is important to note that low and high levels can cause damage to the liner. Under the right circumstances with pH below 7.0, the liner can actually grow and develop unsightly wrinkles, staining of walls, chlorine loss, and skin/eye irritation. High pH greatly accelerates the aging process and shortens the life of the liner. High pH can also cause chlorine inefficiency, plugged filters, and skin/eye irritation. Make sure to test your pH regularly with your test strips so these things can be avoided. If your pH appears to be off on your test
strips, bring your pool water sample to Galaxy Pool Spa Patio and we’ll professionally test your water for free.
Total Alkalinity (TA): This refers to the quantity of alkaline materials dissolved in water, which act as a buffer in controlling pH change. If the TA is below 60 ppm the pH will not stay in proper range. The pool water may promote cloudy or clear green water, corrosion, and cause damage to the pool fixture and equipment. TA that is above 120 can cause cloudy water or scale, and can also create an ideal environment for algae growth.
***Note: Cyanuric Acid (stabilizer) will interfere with the test for TA, therefore it is necessary to compensate for this interference. For pools with a CyA above 50 ppm, the correction formula is: TA – 1/3 CyA = True Total Alkalinity
Cyanuric Acid (CyA) (stabilizer): If you are using any chlorine-based sanitizing product, the firs thing you need to do to the water is stabilize it. By stabilizing the water you are protecting the chlorine from the sun’s UV rays, and greatly reducing your chlorine usage. Think of the stabilizer as an invisible umbrella over your pool. The only way stabilizer
leaves the water is by dilution or evaporation.
Calcium Hardness: This refers to the calcium and magnesium content of the pool. It is wise to check this regularly to prevent problems with the liner and filter system.
Metals: Having high levels of metal in the water is the leading cause of pool stains. Test these levels monthly or bring a water sample to Galaxy Pool Spa Patio.
Volume in Gallons by Pool Size & Shape
Use this chart to find the approximate volume of your pool in gallons.
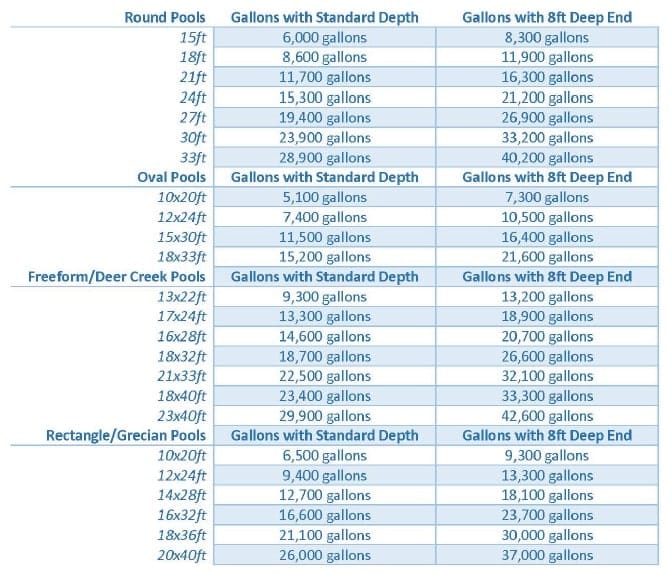
If you do not see your pool shape and size here, you can easily calculate it.
Round Pools:
Gallons = Diameter (ft) x Diameter (ft) x Average Depth (ft) x 5.9
Oval Pools:
Gallons = Length (ft) x Width (ft) x Average Depth (ft) x 5.9
Freeform/Deer Creek/Grecian/Rectangle:
Gallons = Length (ft) x Width (ft) x Average Depth (ft) x 7.5
Average Depth = (Shallowest Depth in feet + Deepest Depth in feet) / 2
Pristine Blue & Advanced Pool Start Up Instructions
PristineBlue & Advanced Pool is a copper-based non chlorine program for pools and spas with a once every 14 day (bi-weekly) treatment that is compatible with chlorine, bromine and lithium sanitizers. In the PristineBlue line there are six products. They are all designed to work together to get the best benefit from your investment.
Before you begin: We suggest you start by bringing a water sample in for a complete analysis of your water by our water care specialist. Make sure your pool is clean and all equipment is functional. Remove lwaves and other debris and then vacuum. Check to make sure pump, heater and other equipment are operational. Clean or backwash the filter. Run the filter continuously throughout this start-up process.
1. Balance your water
Balance water to the following ranges. Pristine Blue test strips are best to use when testing for pH & Alkalinity
- Alkalinity should be between 50 and 90 ppm
- pH should be between 7.2 to 7.6
- Calcium Hardness should be between 100 to 400 ppm
NOTE: It is unlikely, but achieving optimal water balance may take several days.
2. Prep
2a. Add 2 ounces of PristineCheck or Advanced Prep per 1,000 gallons of pool water. Run filter for 6 hours.
2b. Add 1 pound of PristineExtra or Advanced Shock per 10,000 gallons of pool water. Continue running your filter pump for a minimum of 12 hours before proceeding.
2c. Backwash filter or clean cartridge thoroughly with Galaxy cartridge cleaner
3. Add Pristine Blue
PristineBlue & APSP Products may be added directly to your pool water without mixing. It is not necessary to wait between applications of the different products. DO NOT pour into skimmer.
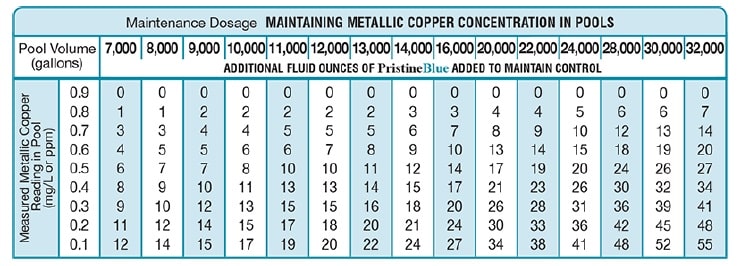
3a. NEW USERS: Add 2 ounces of PristineBlue or Advanced XXX Blue per 1,000 gallons of pool water.
3b. SPRING OPENING/CURRENT USERS: Test the PristineBlue level and add PristineBlue according to
the Top-off Chart below.
REMINDER: Test periodically to ensure pH is within the 7.2 to 7.6 range after start-up.
Pristine Blue & Advanced Pool Maintenance
Maintenance Cycle- Every 2 weeks:
Before you begin: To avoid unnecessary waste of useful chemicals, ALWAYS backwash sand filter, or clean your cartridge filter PRIOR to performing these steps.
PristineBlue & Advanced Pool is a copper-based non chlorine program for pools and spas with a once every 14 day (bi-weekly) treatment that is compatible with chlorine, bromine and lithium sanitizers. In the PristineBlue line there are six products. They are all designed to work together to get the best benefit from your investment.
Balancing the water may take several days, but is well worth the wait.
1. Balance
Pristine Blue Test Strips are best to use when testing for pH and Alkalinity
- Alkalinity should be between 50 and 90 ppm
- pH should be between 7.2 to 7.6
- Calcium Hardness should be between 100 to 400 ppm
2. Prep
NOTE: We recommend to shock once a week or after: 1) heavy bather load, 2) excessive rain.
2a. Shock with 1 pound of PristineExtra or Advanced Shock per 10,000 gallons of pool water. (preferably at night)
2b: (Optional) Add 2 ounces of Turbo Blue Clarifier per 10,000 gallons of pool water.
3. Add PristineBlue
PristineBlue & APSP Products may be added directly to pool water without mixing. It is not necessary to wait between applications of the different products. DO NOT pour into skimmer.
3a: Test for residual PristineBlue or Advanced Blue level of your pool. (Use Mini Test Kit or bring to store for testing)
3b: Add 2 ounces of PristineClean or Advanced Clean per 10,000 gallons of pool water.
3c: According to top off chart below add appropriate ounces of PristineBlue or Advanced Blue and relax!
REMINDER: Test periodically to ensure pH is within the 7.2 to 7.6 range after start-up.
Nature’s Pure Start Up Instructions
Nature’s Pure is an inline copper ionizer that releases microscopic mineral ions which control bacteria & algae. This allows you to reduce the chemicals you put in your pool.
1. Balance your water
Keeping your water balanced will help your copper ionizer last longer and be more effective.
- Alkalinity should be between 80 and 120 ppm
- pH should be between 7.2 to 7.6
- Calcium Hardness should be between 200 to 300 ppm
- TDS (Total Dissolved Solids) Should be between 1000 & 2000 ppm
2. Prep your water
If your pool was green at prior to starting your ionizer please shock daily until water is clear.
2a. Add 1lb of Shock per 10,000 gallons. (preferably at night)
- Run filter for 6 hours then rinse cartridge filter
2b. Add 20lbs of Galaxy Borate (New Pools Only)
- Broadcast over entire pool surface and brush any undissolved product from bottom of pool
- pH will rise as a normal reaction to the introduction of this product
- Let it circulate for 2 hours
2c. Add 15lbs of Galaxy pH Reducer (New Pool Only)
- Broadcast evenly over entire pool surface and brush any undissolved product from bottom of pool
- Retest after 24 to 48 hours
- Do Not add additional products until the pH is between 7.2 – 7.6
2d. Add Galaxy Stabilizer 2lb per 10,000 gallons to increase the stabilizer to between 20-50 PPM.
- Add directly to the skimmer with the pump on high & don’t clean the filter for 72 hours.
- The pool will need to run continuously on high for the first 72 hours.
2e. Add 4 oz Algaecide60 per 10,000 gallons
- Add directly in front of the return jet with pump on high
2f. Add 4oz water polish
- Add directly in front of the return jet with pump on high.

3. Turn Ionizer on and set at level 3
Important: Maintain a chlorine level of 1-3 ppm while copper level is reaching to .3 – .5 ppm.
3a. Keep your pump on high speed for the first week or until your copper reading is between .3 and .5 ppm. The
active light will only be on when your pump is on high speed.
4. Add Tablet to Skimmer
Important: For tablet to dissolve properly DO NOT turn pump off for more than 3 hours at a time.
4a. Add 1 NST tablet per 10,000 gallons to the skimmer basket
Nature’s Pure Maintenance
Maintenance Cycle- Every Week:
1. Balance
You only need to test for Borate early in the season to establish a level of 30-50 ppm. Borate does not dissipate
and usually does not need to be tested until late in the season
1a. Test water using pool test strips and mini test kit for copper or bring a water sample to one of our stores.
1b. Add chemicals, if necessary, to balance water to appropriate ranges below:
- Alkalinity should be between 80 and 120 ppm
- pH should be between 7.2 to 7.6
- Copper should be between .3 and .5 ppm
- FCl (Free Chlorine) should be between .5 to 3 ppm
2. Ionizer Settings
Reminder: The Ionizer is only releasing copper when the power and active light are on.
2a. Once your copper level reaches 0.3-0.5 you can put your pump on low speed for 16 to 18 hours a day. Make
sure your pump is on high speed for a minimum of 6-8 hours/day to maintain copper level.
2b: If your copper level drops below .3 you can turn up the level setting on your ionizer or run pump on high more.
3. Add Shock
NOTE: Shock pool once a week or additionally after heavy bather load or excessive rain.
3a. Turn pump on high and broadcast the shock over the entire pool then run pump for 6-8 hours minimum.
3b. Alternate Galaxy Oxy Shock with Galaxy Shock each week.
- It is preferable to sock your pool at night when using Galaxy Shock
4. Algaecide and Polish
Note: For best results. Add 12 hours after shock to help restore water clarity
4a. Add 1oz of Algaecide 60 per 10,000 gallons directly in front of return jet.
4b. Add 1oz of water polish per 10,000 gallons directly in front of return jet.
5. Add Tablet
Important: For the tablet to dissolve properly DO NOT turn pump off for more than 3 hours at a time.
4a. Add 1 tablet per 10,000 gallons to the skimmer basket
- If FCl (Free Chlorine) reading is ever higher than 3ppm reduce the frequency that you add a tablet to the
skimmer.
Nature’s Pure Troubleshooting
While working correctly, 1) Power light will be on, 2) Active light will be on when pump is on high, 3) Chamber light will be off
| Issue 1: Power light is not on | Issue 2: Power light is on & Active light is off | Issue 3: Chamber light is on |
| 1. Is unit plugged into 110v/20amp GCFI 2. Is power cord pushed in on unit? 3. Unplug and plug the unit back in. 4. Check the breaker. |
1. Unplug, plug back in, wait 5 minutes then power on. 2. Is pump on high? 3. Is TDS level over 1000? |
1. Is the active light on? 2. Has the unit been working all season? If yes to both, your copper anodes may |
If none of the above works, check to see that your unit has been plumbed correctly. An arrow on the black part of the unit will indicate the correct direction of water flow.
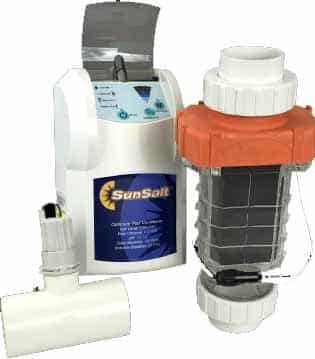
SunSalt Pool Sanitation System
Use this checklist to help start up and maintain your Sunsalt System
1. BALANCE YOUR WATER
- Test water and balance
- pH 7.2 – 7.6
- Alkalinity 80 – 120 ppm
- Calcium Hardness 100 – 300 ppm
- Stabilizer 50 – 80 ppm (60 is best)
- TDS below 1500 ppm
- Make sure no phosphates are present in water. Phosphates can affect the way the salt cell works. If you have phosphates purchase a Galaxy phosphate remover.
- Make sure no metals are present in the water. If you have metals purchase a Galaxy metal remover.
- Testing can be done at your local store or by using test strips. Test strips for salt are available and are separate from test strips that test for pH, Alkalinity, Hardness, and Cyanuric Acid (Stabilizer). TDS can only be tested in the store.
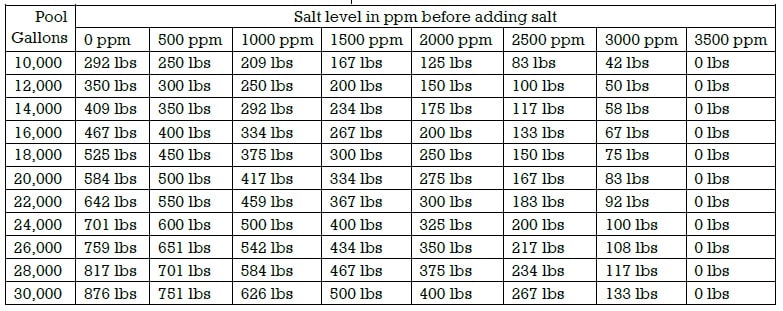
2. Add Salt
- Once your water is balanced and free of phosphates and metals you can add salt.
- Ideal salt level is 3500 ppm.
- Only use granulated pool salt
- How much salt to add? See chart below
Testing Frequency
- WEEKLY: Test for Free chlorine (should be between 1-3ppm) and pH between 7.2 – 7.6
- MONTHLY: Test for Salt, Alkalinity, Stabilizer, and Calcium
- Inspect cell every three months and clean as needed with vinegar or diluted muriatic acid
Maintenance Chemicals
- Shock pool weekly (or after heavy rain) with 1 lb of shock per 10,000 gallons
- Add algaecide monthly or weekly per instructions on your algaecide bottle
- Add salt any time the level drops below 3500 ppm, use chart above to measure how much salt to add
- Maintain pH by testing weekly and after heaving rain and adjusting as necessary based on package instructions for dosage
- Maintain Alkalinity, Stabilizer and Calcium levels based on monthly testing and reference package instructions for dosage
Equipment and Electrical Requirements
- Sunsalt can be run on 110 or 220 volt power
- Comes with 4 parts: Power supply box, electrolytic cell, flow/temp sensor, and zinc anode
Winterizing
- Measure salt level, balance water, add scale and stain sequestering agent, add oxidizer and algaecide
- Follow instructions for winterizing the cell, pump, filter, and pool in the winter closing section of this book or on our website.
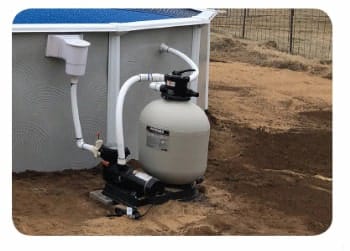
Sand Filter System & Operation
ALWAYS turn the pump motor off before changing positions!
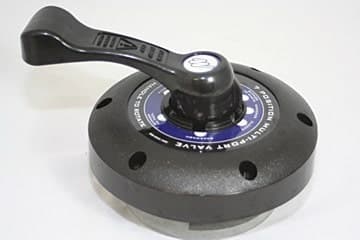
ONLY turn the multi-port valve in a clockwise position! There is a gasket inside of the valve that will rip, tear or wear prematurely if the valve is turned the opposite way.
Under normal conditions expect to backwash the filter every two weeks. You’ll know when it’s time when the pressure gauge reads 7-10 psi above the normal running pressure, or when the pressure of the water coming out of the return jets lowers. To determine your normal running pressure watch the gauge for the first week or two, each pool varies slightly. If you have a fountain installed this will change the reading from normal.
After backwashing for approximately 1-2 minutes, ALWAYS rinse for half the time you backwashed.
Starting the pump and motor for the first time: When the water level is in the middle of the skimmer, turn the multi-port valve to backwash position. Turn on the pump, backwash for 1-2 minutes then turn the pump off. Turn the multi-port valve to the rinse position, turn the pump back on and rinse for 30 seconds. Turn the pump back off and turn the multi-port valve to the filter position and turn the pump on. This is to ensure that sand does not go into the pool water through the return jet.
- Filter Position: To help prevent algae and reduce chemical costs, we recommend running your pump 24/7 on low speed. But no less than 12 hours a day.
- Bypass to Waste/Drain/Waste: Used in lowering water level, or vacuuming algae and heavy debris. To vacuum on this position, you must firs fil the pool above the skimmer. Never allow the water level to get below the skimmer, while vacuuming on this position keep a garden hose running in the pool.
- Backwash Position: This position churns the sand and runs water backwards through it to get rid of any debris that has been trapped. This position is used when the pressure gauge is 7-10 pounds above normal running pressures. Backwash for approximately 1-2 minutes.
- Rinse Position: This position rinses the top layer of the sand to compact it down after backwashing; this is to prevent sand from
shooting into the pool through the return jet when it is put back on the filter position. Rinse for half the time you backwashed. - Bypass to Pool/Recirculate/Whirlpool: This position circulates water in the pool without passing through the sand filter. This position is rarely used and is not recommended for normal filtration Only use this position if we recommend it.
- Closed Position/Test: This position is used to close the return line, the only time this needs to be used is when you are checking
your pump basket, cleaning your sand filter, and taking off or replacing any other components of the pump or filter. - Winterize Position: This position is used when winterizing your pool.
For more sand filter instructions visit www.galaxyhomerecreation.com/learning-center
Cartridge Filter System & Operation
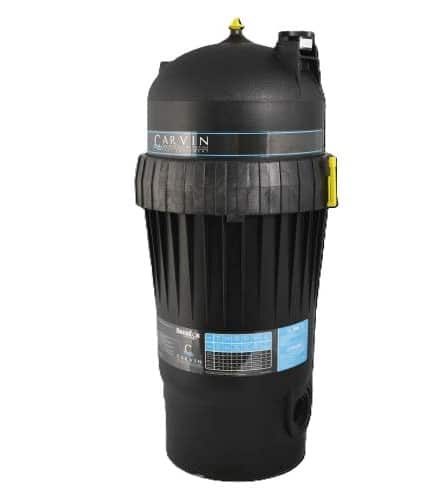
Start-Up Tip
Determine the baseline PSI on your pressure gauge. It is a good idea to do this at install when the filter is new and clean.
Cartridge Filter Start-up
Step 1: Make sure the water has reached the middle of the skimmer.
Step 2: Make sure all valves are open.
- Gate valves are closed when the gate handle is lowered and rotated to lock it in place
- Ball valves are closed when the handle is turned clockwise.
Step 3: Open air pressure release valve on top of the filter housing.
Step 4: Turn pump on (Remember to never plug your pump into an extension cord. Always use a 20 amp receptacle.)
Step 5: Air will come out of the air pressure release valve and then water will begin to shoot out. This means that the air has come out of the system. Immediately close the air pressure release valve by turning clockwise until it stops turning.
Step 6: Check the PSI on the pressure gauge and make note of it as your baseline.
- For pumps that have a low and high option, the pressure gauge will usually only register when the pump is on high.
Step 7: Check for any leaks.
- Often small leaks can happen immediately after install due to o-rings not sitting just right or fittings needing to be tightened.
- If you notice any drips or leaks follow step 8.
Step 8: Rectifying any leaks.
- Turn pump off
- Close any valves that are open or if you don’t have valves, use a plug in the skimmer and return jet.
- O-rings are located on filter canister, trap body lid of pump, and in bridge between the pump and filter.
- Ensure o-rings are clean and free of debris.
- When putting the canister lid back on make sure air pressure release valve is open and that you press the lid down firmly and not twist it. Twisting can cause the o-ring to pop out of place and cause leaks.
Step 9: Put top of the filter housing back on and put the Lock Ring back on securely.
Step 10: Start back at Step 2 to get your filtration system going again.
When to Clean? When the PSI is 8 to 10 higher than the baseline. This is an indication that it is time to clean your cartridge filter.
For cartridge filter cleaning instructions visit www.galaxyhomerecreation.com/learning-center
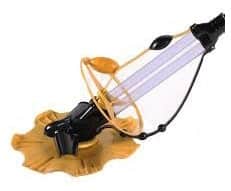
Vacuuming Your Pool
- Attach the telescopic pole and vacuum hose to the vacuum head. Make sure that the swivel cuff end of the hose is on the vacuum head. If you have an inground pool make sure the main drain is turned off and only one skimmer has suction.
- Sink the vacuum head under water along with the vacuum hose.
- Take the free end of the vacuum hose and put it in front of the return jet to fill the hose full of water. (This primes the hose and removes all the air.)
- When the air is out the hose, he hose will sink to the bottom.
- Once this happens keep the hose under water and connect the hose to the vacuum plate inside the skimmer.
- If you vacuumed a lot of fine dirt, make sure to backwash and rinse your sand filter or spray off your cartridge filter after vacuuming. Backwash for approximately 1-2 minutes and rinse for approx. 15-30 seconds.
Sand Filter Systems – Always vacuum on filter position (pg. 15), unless there is algae or heavy debris in the pool, in which case you should vacuum to waste by using the waste position on the multiport.
Cartridge Filter Systems – Keep filter in canister unless there is algae. For an above ground pool take filter out, close off return line, and open drain cap to vacuum out waste. For an inground pool (if you don’t have a built-in waste line) follow the same procedures.
REMEMBER TO KEEP A GARDEN HOSE IN THE POOL.
IF WATER LEVEL DROPS LOW IN SKIMMER, STOP AND REFILL POOL.
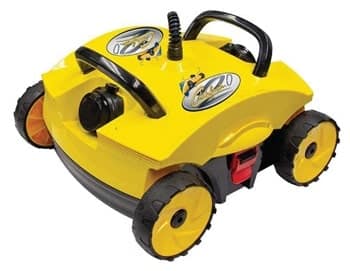
For automatic and robotic vacuum instructions visit www.galaxyhomerecreation.com/learning-center
Opening Your Pool
Use this checklist to open your pool when your water temperature is 60 degrees.
SECTION 1: Removing Cover
COVER
- Clean all water and debris from the top of your cover
- Remove cover
CLEAN AND STORE COVER
- Fold, roll, and put cover in 35 gallon garbage pail
- Fill pail with one quart of pool cover cleaner
- Let cover soak
- Remove cover and let it dry before storing
SECTION 2: Hoses, Plugs, Filters, and Pumps
HOSES
- Hook up hoses
- Replace plugs on the filter, pump, and motor
- Make sure all o-rings and gaskets are in place
PLUGS
- Remove winter plugs that may be in your return jet and/or skimmer
- Now fill with fresh water until the water level is up to middle of the skimmer
SAND FILTER
- Start pump on backwash position
- Backwash for 2 minutes, rinse for 15 to 30 seconds
CARTRIDGE FILTER
- Place a clean filter in canister
- Replace winter drain plug
SECTION 3: Clean Pool and Add Chemicals
- Vacuum and clean pool accordingly
- Let pump run for 24 hours
- After 24 hours, bring a water sample in to one of our showrooms. We will test it and help you get the chemicals you need in order to balance your water.
PRISTINE BLUE or ADVANCED BLUE
- Test water and balance if needed
- If water is green shock with 2-3 times as much shock as you would normally use on a weekly basis
- Clean filter and repeat shock until water is clean
- Balance your water.
- Bring in a water sample or use test strips and PristineBlue (copper) testing kit
- Add Pristine Check or Advanced Prep (2 oz. per 1,000 gal.)
- Run filter for 6 hours
- Shock pool with your normal amount of PristineExtra or Advanced Shock (1 lb./10,000 gal.)
- Run filter for 12 hours
- Backwash filter and clean cartridge thoroughly
- Add Pristine Blue or Advanced Blue
- New Users add 2 oz per 1,000 gallons
- Spring Opening users test water for current Pristine Blue or Advanced Blue level then add dose to reach .9ppm
CHLORINE POOL
- Test water and balance if needed
- If water is green shock with 2-3 times as much shock as you would normally use on a weekly basis
- Clean filter with Galaxy Cartridge Cleaner and repeat shock until water is clean
- Use the Poolife Opening Kit as instructed on the box for your pool size
- Opening Kit steps
- Test and Balance the water
- Add 4oz. of Algaecide 60 for each 10,000 gallons per label directions.
- Add in both bags of TurboShock with pump and filter running
- Add sanitizer and maintain between 1 and 4ppm of chlorine
NATURE’S PURE
- Test water and balance if needed
- If water is green shock with 2-3 times as much shock as you would normally use on a weekly basis
- Clean filter with Galaxy Cartridge Cleaner and repeat shock until water is clean
- Add Galaxy Borate 20lbs
- Add Galaxy pH Reducer 15lbs
- Plug in ionizer
- Set it to 3
- Put 1 Tablet in skimmer
- Test weekly for copper level ( 0.3 to 0.5 ppm is ideal)
Winterizing Your Pool
Use this checklist to close your pool for the winter after temperatures drop to highs of 60 to 65 degrees for a week.
SECTION 1: Chemicals
PRISTINE BLUE or ADVANCED POOL
- Balance your water.
- Bring in a water sample or use test strips and PristineBlue or Advanced Pool (copper) testing kit
- Add a final dose of PristineBlue or Advanced Blue to reach the level of .9ppm
- Add your normal dose of PristineClean or Advanced Clean (2 oz./10,000 gal.)
- Shock pool with your normal amount of PristineExtra or Advanced Shock (1 lb./10,000 gal.)
- Follow with the steps in sections 2 through 4
NATURE’S PURE
- Balance your water
- Copper levels = 0.3-0.5 ppm
- Closing steps:
- Add 4oz. of Algaecide 60 per 10,000 gallons
- Add 1 lb. of Advanced Shock per 10,000 gallons with pump and filter running 2 cups = 1 or 16oz. = 1 lb.
- Follow with the steps in sections 2 through 4
SECTION 2: Plugs
RETURN JET PLUG
- Remove the eyeball (or fountain if installed) from return jet
- Insert Universal Plug and turn wing nut to expand plug for a tight fit
PLUGGING YOUR SKIMMER
- Use a Compensator to plug your skimmer and you will not need to drain water from your pool
- Remove skimmer basket
- Insert Compensator into hole inside bottom of skimmer
- If you do not want to use the compensator you will need to drain pool to below the skimmer level
SECTION 3: Covering Your Pool
AIR PILLOWS (GO IN CENTER OF POOL UNDER THE COVER)
- 15’ to 24’ round pools use a 4’x4’ pillow in the center of pool
- 25’ to 33’ round pools or oval pools use a 4’x8’ pillow in the center of pool
POOL COVER APPLICATION FOR ABOVE GROUND POOLS
- Unbox and unfold pool cover
- Thread the cable through the grommets or loops around the edge of the cover
- Spread cover over pool (this is easier with 2 people)
- Make sure the overlapping cover is even on all sides of pool
- Thread the cable into the winch and pull it tight to secure the cover
SEMI INGROUND WITH DECK
- Unbox and unfold pool cover
- Thread the cable through the grommets or loops around the edge of the cover
- Spread cover over pool (this is easier with 2 people)
- Slip cover between the top rail and deck
- Make sure the overlapping cover is even on all sides of pool
- Thread the cable into the winch and pull it tight to secure the cover
INGROUND OR SEMI WITH FULL DECK ON TOP RAIL
- Unbox and unfold pool cover
- Spread cover over pool (this is easier with 2 people)
- Use 1’x8’ water bags to hold down edges of your cover
- Calculate number of water bags needed
- Round pools: Size of pool (Diameter x 3.14)/8 = number of water bags needed
- Oval, Free Form or Rectangular pools: ((Length + Width) x 2)/8 = water bags needed
SECTION 4: Hoses, Filters, and Pumps
HOSES
- Unhook hoses from pool or from the pump and filter
- ClearBlue and Nature’s Pure users need to unscrew the copper cell. Both the cell and control pad need to come in for the winter
- If hoses are hard plumbed, you can leave them but make sure to pull drain plug on your filter
SAND FILTER
- Remove winter drain plug at bottom of filter
- Set Filter to Winterize
- Take your pump inside for the winter
CARTRIDGE FILTER
- Open pressure release at top of filter
- Remove winter drain plug at bottom of filter
- Take in your pump and filter cartridge for the winter