Welcome
Welcome to the Galaxy Home Recreation family! The following guide is to help you understand your new hot tub or swim spa and the maintenance needed for it to perform at its optimal level so that you can get the most enjoyable use out of it.
Your spa installation will require the following from you:
- To decide where you want your new spa situated and the foundation it will sit on
- To determine the access for us to best deliver your spa
- Adequate power as well as proper cord length for us to hook up your new spa
- Accessible garden hose and water to fill the spa
Different spas have different power requirements. Be sure to check with your salesperson and/or your installation agreement before having an electrician install power to your desired location. Having improper power may result in an additional trip fee by Galaxy to come back and finish your install and potentially an additional cost assessed by your electrician to come back and correct the power.
Our Customer Care Team will reach out to you and schedule a day that is convenient for your installation within 2 business days of your finalized purchase.
For questions on scheduling, please call/text our Customer Care Team at 918.794.7221
You may submit a service request directly from our website by clicking on the “Service Request” button.
Additionally, help videos can be seen online at www.GalaxyHomeRecreation.com. You may also place chemical orders on-line and have them shipped directly to your home! Free shipping with any $99 chemical and/or accessory order.
Hot Tub School
You’re Invited
As a Galaxy customer you are invited to our FREE Hot Tub School! A one hour instructional class that goes over how to use your hot tub, maintain and balance your water, and answer any questions you may have about your spa. This class is for Hot Tub and Swim Spa owners.
Join us every 3rd Saturday of the Month 9:00am at one of these locations
North OKC, South OKC, Norman OK, Broken Arrow, Fort Smith AR, Rogers AR
For questions about your purchase, please contact your local salesperson
| Oklahoma City South 405.947.6565 | Northwest AR 479.250.1320 |
| Oklahoma City North 405.546.4050 | Fort Smith AR 479.306.6800 |
| Norman OK 405.308.4445 | Clearance Center 918.835.1176 |
| Broken Arrow 918.770.7134 |
Installation Photos
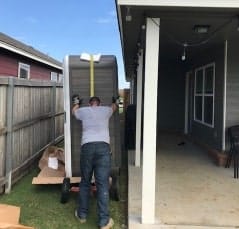
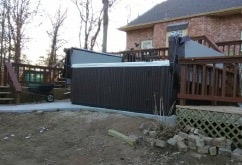
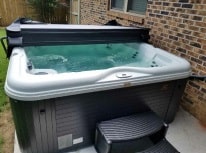
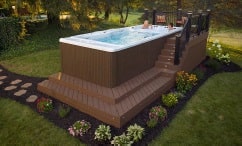
Most homeowners would like to know what their project will look like after installation. Below are some great photos of our installation and what to expect after the install is completed.

Before Installation Checklist
Pad For Your Spa: A concrete pad is the best place to set your hot tub and the only recommended place to put a swim spa.
- Hot tub concrete pads should be a minimum of 4” thick. However, if you choose not to use concrete as your hot tub pad, Galaxy does offer a Spa Pad for up to 8’x8’ hot tubs that can be placed on a level surface in place of a concrete pad.
- Swim spas need a 6” concrete pad reinforced with rebar.
- We do not level hot tubs so make sure your spa pad is as level as possible.
Electrical Requirements: Galaxy sells both 120v hot tubs as well as 220v hot tubs and swim spas. Always refer to the owners manual for electrical requirements
- 120 volt “plug-and-play” models typically have no more than 5’ of cord available. Plan for the tub to be close to the outlet. For more exact cord lengths and to determine if it is a 15 or 20 amp plug please contact your salesperson.
- 220 volt spa can require 40, 50 or 60 amp service. Please see chart below to determine the amps and wires needed for your spa.
| Product | Voltage | Amps | Wires |
| CalSpas, Avalon, Bel Air, Bel Air Plus, Costa-X Pacifica Plus, Reno, Malibu, & Cancun | 240V | 50A | 4 |
| Jacuzzi 215, 225, & 315 | 120/240V | 15/40A | 4 (240V) |
| Jacuzzi 235, 245, 275, 280, 325, 335, 345, 355, 365, 375, & 385 | 240V | 50/60A* | 3 |
| Jacuzzi 400 Series | 120/240V | 50/60A | 3 |
| Nordic Stella MS, Retreat MS | 120/240V | 20/40A | 4 (240V) |
| Nordic Impulse DP | 240V | 15/40A | 4 (240V) |
| Nordic Encore LS, Jubilee SE | 240V | 50A | 4 |
| Stealth 7L,7B & 8L | 240V | 60A | 4 |
| Sundance Montclair, Chelsee, Optima & Cameo | 240V | 50A | 3 |
| CalSpas Swim Pro, Commander | 240V | 60A | 4 |
| Hydropool 2023 Aqua Trainer 14AX | 240V | 60A | 4 |
| Jacuzzi Power Play J13 & Power Active J16 | 240V | 50A | 4 |
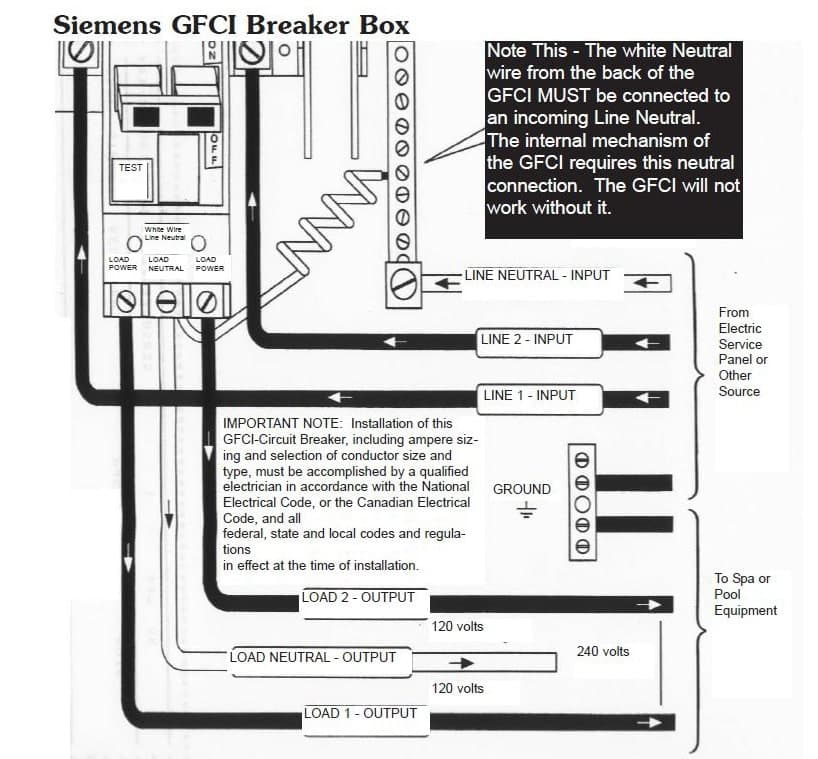
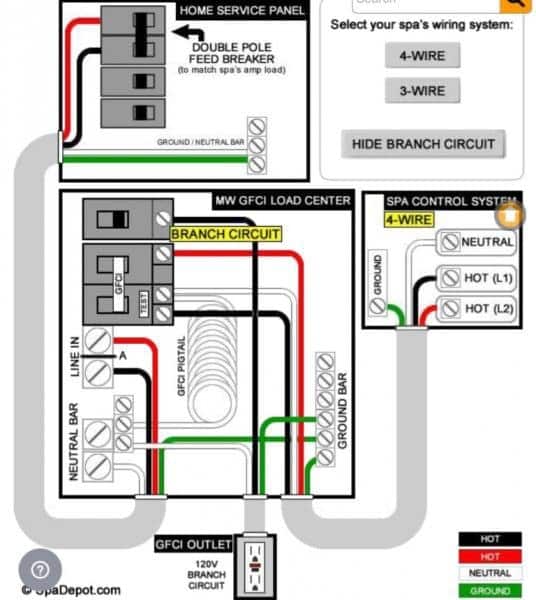
It is crucial to ensure that your electrician wires your GFCI according to the diagrams to the right. If not hooked up correctly this could void your spa’s warranty.
SPA 4-Wire Diagram
SPA 3-Wire Diagram
Before Installation Checklist
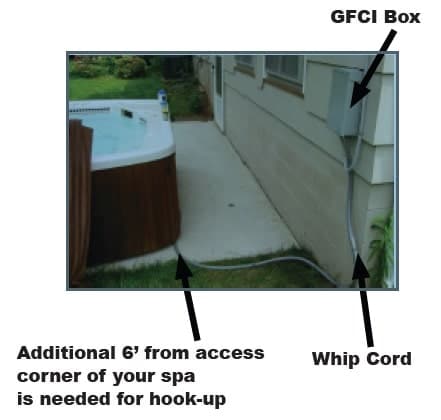
Whip Cord Requirements: Have your whip cord ready with plenty of length so we can wire your spa at install
- The whip cord contains the wires needed for us to hook up your spa.
- Refer to the diagrams below for guidance on whip cord location and length.
- Please note that Galaxy charges if a return trip is required to connect the electric to your spa.
- Please have your box and whip cord ready at time of install.
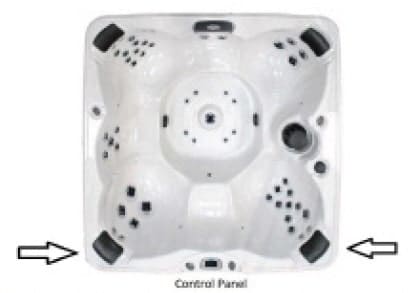
- The whip cord needs to be long enough to go from your GFCI electrical box to inside the hot tub where the spa pack is located. To figure out the length measure from the GFCI box to either front corner of the tub then add an extra 6 feet to ensure the whip cord is long enough. If you have any questions please consult your salesperson or customer care team.
Access to Deliver Your Spa:
- Hot tubs and swim spas vary in height and width. Most hot tubs can be turned on their sides for delivery requiring 4’
-5’ access needed. - Swim spas can not be delivered on their sides, therefore, there must be 10’ of clearance. Both swim spas and hot tubs have minimum clearance necessary for delivery so please check with your salesperson on the access needed for the delivery of your particular spa.
- On more restricted access situations the home owner can often remove a fence panel for delivery of their spa.
- If a crane is necessary it is the customer’s responsibility to pay for the crane service
- Please note that installing on a deck or surface higher than 30” off the ground may require extra manpower or the assistance of a crane.
- Additional costs for such delivery are the responsibility of the purchaser in accordance with your installation agreement.
Location of Your Spa- Please consider the following when planning the location of your spa:
- Location of steps
- Location of GFCI box
- Location of the control panel
- Which way your cover will open
- Size and shape of spa
- Type of Cover Lift you are using and clearance needed
Cover Lifters
Cover lifters are available for your spa from Galaxy. They make removing your hot tub cover simple and easy! Here are some examples of cover lifts available.
- Basic Easy Lifter (G-Lyft)
- Hydraulic Cover Lifter
- Cover Shelf
- Cover RX
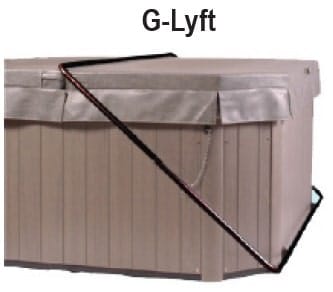
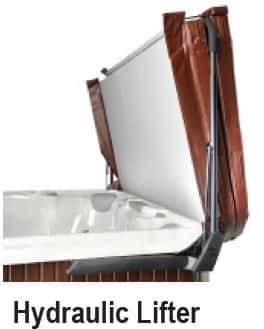
If you purchased a cover lifter with your spa, Galaxy will install it when we deliver your spa provided the required clearance is available.
G-Lyft: Requires 15- 18” of clearance behind the spa and 6-8” on the sides.
Hydraulic Lift: Requires 6” clearance behind the spa and 6-8” on the sides.
Cover Shelf: Requires 32”
Cover Rx: Requires 18” behind and no clearance on sides
Also keep in mind the height requirements if you are putting your spa under a pergola or other covered area as you will need a minimum of half the cover size of clearance to open your cover. There is also cover overhang off the back of the spa that will need room available to operate. Keep this in mind if you are dropping your spa into a deck or similar.
While cover lifters are typically installed on the back of a hot tub (opposite the control panel), on many square-shaped spas the option is available to install on the back or on either side if you prefer the cover and the natural privacy the cover creates facing a different direction. This option is not available on rectangle shaped spas. If you have a rectangle-shaped spa and need your cover somewhere other than the back there are other options available. Contact your salesperson for information.
Starting Up Your Spa
The following are the steps needed to get your spa started. This applies to the initial fill-up upon delivery of your spa as well as each time you drain and refill your spa.
The following are the steps needed to get your spa started. This applies to the initial fill-up upon delivery of your spa as well as each time you drain and refill your spa.
- Fill your spa with clean water through the filter compartment using a Hot Tub Prefilter. Never do a fresh fill by putting the hose directly into your spa. This can cause an air lock in your jets. It
is fine to top off your water level directly into the spa, however, on initial and future fresh fills,
always place the garden hose into the filter area. - Turn on the power to spa at the circuit breaker.
- Insert Mineral Stick into skimmer compartment, or skimmer basket. (See mineral stick placement photo on page 8)
- Test and if necessary adjust your water’s balance. pH 7.2 – 7.6; Total alkalinity 80 – 120; and Calcium Hardness 100 – 400. You can also bring a sample of your water to any Galaxy
Home Recreation location and we will digitally test your water and help explain any necessary adjustments. (See page 9 for test strip and balancing instructions. - Add Galaxy Granular Chlorine & Step 3 Galaxy Energizer following dosage on bottle. Be sure your cover is open and jets are running. Wait 30 minutes to cover spa or to get in.
- Before entering your spa be sure to rinse, not wash your bathing suits and remove all lotions and make-up to ensure your water stays fresh and clear without foaming.
- Maintain your water using the Galaxy Water Care Systems Instructions in this guide. (See page 10)
For videos on maintaining your spa, testing your water and more, visit our Resources section.
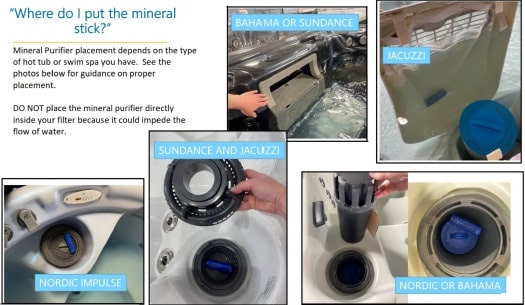
What is a mineral stick?
Mineral sticks contain silver and copper to help sanitize water and prevent algae. This allows you to use much less chlorine or bromine sanitizer. Remember when you use a mineral stick to change it every 4 months when you drain and refill your spa.
Chlorine requirements:
Chlorine 1.5 to 3 ppm (no mineral stick or UV sanitization)
Chlorine 1 to 1.5 ppm with mineral stick and/or UV sanitization
Bromine requirements:
Bromine 3 to 5 ppm (no mineral stick or UV sanitization)
No less than 22ppm Bromine with mineral stick and/or UV sanitization.
Reading Your Test Strips
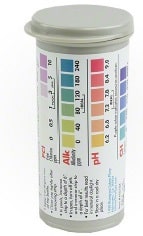
Maintaining proper water balance is critical to having nice, fresh, clean and odor-free water for your enjoyment in the spa. Keeping your spa’s water balanced is easy and quick taking only a few minutes per week if done on a regular basis. If you allow your water balance to get out of control however, it can be a much more tedious process to bring it back into balance.
If you’re new at reading test strips it can seem a little overwhelming at first, but rest assured, after a few times you’ll feel like a pro! And remember, you can always bring a sample of your water to any Galaxy Home Recreation location and we will gladly test your water for you.
On most hot tub test strip bottles you’ll see four readings that you can test for:
- FCI or the Free Chlorine in your water
- Alkalinity
- pH
- CH or the Total Hardness of your water
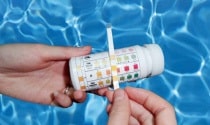
Testing your water with test strips
- With a dry hand pull one test strip out of container (don’t touch pads)
- Close the lid
- Make sure the jets are off in your spa
- Dip the test strip into the water at least 6”
- Immediately pull the test strip out and compare it to colors on the bottle
- It’s easiest to read the colors in daylight
- Store in a dry cool place
Products used to balance water:
- pH/Alkalinity decreaser (Spa Down)
- pH/Alkalinity increaser (Spa Up)
- Hardness increaser (Calcium Booster or Calcium Hardness Increaser)
How to balance your water
- Follow instructions and dosages on the bottles of any balancing chemicals you purchase.
- Always adjust alkalinity first before adjusting pH.
If you get a free water test at one of our locations your dosages will be calculated for you.
Weekly Maintenance
- Test your spa water weekly with test strips or bring it into one of our locations for a free test
- Weekly add of stain and scale inhibitor like Protect Plus or Defender to your spa (2 Tbsp for every 400 gallons)
- Add sanitizer to your tub weekly, Step 1 Chlorinating Granules- 1 Tbsp per 500 gallons)
o FCL or free chlorine reading can be as low as 1ppm when you use a mineral stick
o With cover off and jets on put in the chlorine shock
o Wait 30 minutes before you close the cover - Add Step 2 Galaxy Spa Oxidizing shock after each use
o With cover off and jets on put in the non-chlorine shock
o Wait 15 minutes before you close the cover
Extended Maintenance
- Drain and refill spa every 4 months to coincide with the mineral purifier replacement.
- Turn off your spa at the breaker
- Many spas have built in drain hoses in the cabinet. You can also use a sump pump.
- Make sure to refill your tub by putting your hose in the filter housing to prevent air in the lines.
- Before draining your tub you may want to add in Hot Tub Serum Total Cleanse purge gel for a complete cleaning of all plumbing, jets, and shell. This product removes all bio-film and sanitizes.
- You can clean your spa shell, spa cabinet, and inside your cover with a Surface cleaner.
- A microfiber cloth or a magic eraser can also be used to wipe down your spa shell or cabinet.
- Once you have refilled your spa (through the filter compartment) follow instructions on previous pages to balance your water and add start up chemicals.
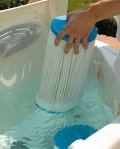
- Condition vinyl spa covers every 3-6 weeks with Spa Cover Conditioner.
Extended Maintenance cont.
For Use With All Water Care Systems
| Monthly: | 1. Rinse filters at minimum once a month. Use a spa comb attachment to get between pleats. |
| Every 3-4 Mos: | 1. Spray filter cleaner on your filters and let sit for 3 minutes before hosing off with water and re-inserting into spa. 2. Drain, clean and refill your spa. 3. Clean and protect vinyl covers with cover conditioner. If in direct sunlight 8 or more hours per day, repeat this step monthly. 4. Replace your Mineral Stick |
| Annually: | 1. Replace CLEARRAY Bulb and clean the quartz tube in Jacuzzi and Sundance spas each year. Replace Nordic or CalSpas every 2-3 years. See website for instructions. 2. Inspect filters and replace if necessary. 3. Diverter valves and some jets can be removed and placed in a 5 gallon bucket with Protect Plus or Hot Tub Serum for extended life. 4. Purge spa with Hot Tub Serum Total Cleanse to rid the jets and lines of buildup and to extend the life of your spa. |
| Other Tips: | If water becomes hazy, test and adjust pH and Total Alkalinity, then add 1 oz shock Renew per 25 gallons. Leave cover open with jet pump running for 30 minutes. |
| Filtration: | The continuous filtration pump on 780, 880 and 980 series Sundance and 3, 4, and 5 series Jacuzzi spas are preprogrammed to operate 12 hours per day. If you encounter water clarity issues, increase filter pump to 24 hours per day. Reference owner’s manual for instructions on how to make this change. |
Helpful Hints
- Lotions, makeup, hair products, and detergents can cause foaming. To prevent this you can rinse off before getting in your spa. Also, it is recommended you have a specific bathing suit that is for spa use only that you rinse instead of putting through the wash to cut down on detergent. (Foam Down is also available to get rid of foaming)
- If your water is ever cloudy make sure it is balanced and add shock. If that doesn’t fix it then you can add Water Clarifier to help the filter catch the small particles.
- Run your hot tub all year. There is no need to winterize your hot tub or to shut it down for the summer. Keeping your spa running all year will keep the water and lines clean as well as keep all the parts in working order.
- Keep your spa at the same temperature. Spas are well insulated, so keeping it at a set temperature for that season will make less work on the heaters and lower energy costs.
- Check your water level periodically. You can top off the water by putting a hose directly into your spa. The water needs to always be higher than the filter so that it doesn’t pull air into the filter and lines.
Troubleshooting Your Spa’s Water
From time to time your spa water may not look clear or may have a foul smell. This section will help you understand and diagnose the issues with your water so that you can get it back to its optimal condition.
Most of the issues surrounding the water in your hot tub or swim spa stem from water that is out of balance. When your spa’s water is not balanced, the Galaxy Step 2 and Galaxy Step 1 are not able to operate keeping your minerals and water care products from killing unwanted bacteria. This will often result in a foul odor coming from the water as well as cloudiness and foaming.
Most water issues can be fixed simply by testing the water with your test strips or bringing a sample of your water to any Galaxy Home Recreation Showroom where we can digitally test your water. Then, adjusting the pH and Alkalinity to their proper levels allowing the shock and chlorine in your water to begin to work as they are designed.
Another common question is about water foaming that is not due to water being out of balance. There are a few things that can cause your hot tub or swim spa water to foam:
- Bathing suits that are washed instead of simply rinsed. Soap from washing remains in your clothes and is transferred into your water causing the spa to foam.
- Using the same bathing suits you use at the lake or beach. It’s always best to have bathing suits that you use exclu sively in your spa. Swimwear that has been used at lakes and beaches will contain bacteria, algae and other foreign particles that will end up in your spa causing issues with your water.
- Lotions and make-up. Foreign substances in water, such as lotions and make-up will also cause water to foam.
- Non-spa fragrances. There are many wonderful scents that you can add to your spa that are made specifically for spas and don’t cause foaming. However, use of non-spa fragrances will cause your water to foam.
What to do if your water has foam
Galaxy Home Recreation offers spa defoamer that will provide immediate but temporary relief from a foaming spa. Apply it directly to the foaming water and you will see the foam dissipate. However, this is not a permanant solution as the cause of the water foaming is still inside your spa. For slight foaming, taking the filters out and rinsing them with a filter cleaner before putting them back in can solve minor issues. If this doesn’t take care of the foaming, you may have to drain your spa, clean it thoroughly, clean the filters again and then refill. If you must drain and refill your spa you will need to also replace the mineral sanitizer that’s in your filter area. Be sure to remove lotions and make-up, as well as thoroughly rinse all bath ing suits prior to re-entering your spa.
Remember, we offer free water testing at all of our locations and we will gladly test your water and help you to correct any issues you may have with your spa.
Startup & Maintenancefor Jacuzzi® and Sundance®

FROG® @ease® is a hot tub sanitizing system+ custom designed for Jacuzzi® and Sundance® Hot Tubs that takes the guess work out of water care so you always feel at ease while enjoying your hot tub.
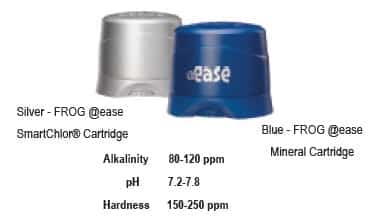
DIRECTIONS FOR USE: For use in hot tubs up to 600 gallons. Use with the FROG @ease SmartChlor Cartridge in the FROG @ease Sanitizing System for Jacuzzi® and Sundance® Hot Tubs. Ensure all hot tub equipment is working properly. Operate the pump and filter as recommended by your hot tub manufac-turer. Clean filter following manufacturer’s directions. May be used with a previously filled hot tub unless it was sanitized with bromine or biguanides. Then drain and fill the hot tub with fresh water before using this product.
- Balance your water
- Use FROG test strips to ensure Alkalinity, pH, and Total Hardness are within recommended ranges.
- Adjust as needed, using balancers
- Add the FROG jump start packet into the water to establish an initial residual of 0.5-1.0 ppm free chlorine

- Set the Cartridges
- Remove SmartChlor® cartridge from package and turn dial to setting that matches your hot tub in gallons.
- Turn the Mineral cartridge dial to #7. No further adjustments are necessary.
- Put the System to Work (Jacuzzi®)
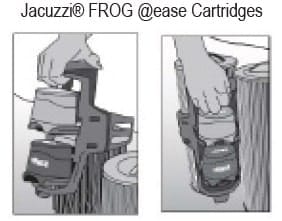
- If the FROG @ease holder is already installed, remove by pulling up and away from filter cartridge with the handle.
- Open the arms until they snap into position, insert the Mineral cartridge into the lower opening, pushing back until it locks in place.
- Follow same procedure for the SmartChlor® cartridge in the upper opening.
- With the cartridges facing the inside of the tub, slide the holder down around the filter that does NOT have the grid underneath until it covers the entire length of the filter.
- Rotate the holder towards the other filter and re-install the filter cover.
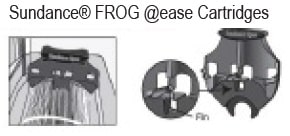
- Put the System to Work (Sundance®)
- To install, slide the holder down over the pipe where the nut holds the filter in place.
- Make sure the openings for FROG cartridges are facing the filter and the fin goes between two pleats of the filter. Push down until it snaps in place.
- Insert the Mineral cartridge into the opening closest to the outside of the hot tub.
- Follow same procedure for the SmartChlor® cartridge in the other opening.
- Replacing Cartridges
- Replace your Mineral Cartridge every four months, or when draining and refilling your hot tub.
- Replace your Smartchlor® Cartridge when empty. Based on the FROG @ease Test Strips showing a lighter color than the “out” indicator on the bottle.
- Cartridges will typically last 3-4 weeks for an average 400 gallon hot tub.
- Routine Hot Tub Care
- Drain and refill hot tub as directed by manufacturer.
- Allow filtration system to be on and running on the usual cycle.
- Test regularly with the FROG @ease Test Strips and follow directions.
- Please note, the SmartChlor® cartridge will maintain 0.5-1.0 ppm free chlorine level as long as water is balanced.
- Shock with Galaxy Step 2 Oxidizing Shock when replacing SmartChlor® cartridge, as well as once a week.

